Our Family

Our Family

Pages

Showing posts with label Crafts/Projects/Hobbies. Show all posts

Sunday, November 6, 2011

Baby Food Success

With my first two kids I didn't really consider making my own baby food for them.  Maybe because I was lazy busy or maybe it just wasn't that trendy at the time.  I did attempt it once or twice when Graham was a baby but he refused to eat it.  In hindsight I believe I did it incorrectly; but anyway they all had store bought food.  Now that Lilah Grace is starting to eat solids I have gone back and forth with whether to make it myself or purchase it from the stores.  I have done a great amount of research and talked to many moms who have made their own and decided I am up for the challenge (besides it really is the cool thing to do these days).  I have used some jar food from the store so I will likely end up doing both.

Per the direction of her GI doctor, I started her out with fruits and she loves them (and they are helping with her BMs).  I decided my first batch of baby food would be avocado because it is super easy and packed full of nutrients.  And yes it is a fruit (just in case any of you were not aware like I wasn't).


I started out with two large avocados and peeled the skin and removed the core thingy (I do not recall the correct term).  The insides are very mushy to begin with so it really did not take much effort to get it soft with a fork and then I used my hand blender to really blend it up.


I set aside enough portions for three days (as long as it is safe to keep refrigerated) and put the rest into ice cubes trays to freeze.  The kids thought this looked fun so they joined in to help.


And voila!  My first batch a huge success.  Lilah Grace loves them and I love the feeling it gives me knowing I did this myself :)


Up next....Bananas :)

Operation De-clutter Flat Surfaces

So in my attempt to gain control of our lives and become more organized, especially in the area of papers, I completed another mini project.  The first part of this was our family memo center which has been utilized (not as much as I would like) as shown below.


A good first step but I still found that the piles of papers, magazines, mail and other miscellaneous items ended up on the kitchen island, counter and table any flat surface.  This becomes very overwhelming and out of control especially when there is no room for the kids to eat.


Okay a very honest moment here - I did clean the piles up a bit before photographing them but you get the idea.

Let's be realistic - even the most organized anal person would have trouble filing things as soon as walking in the door with bags from shopping, backpacks, a baby in an infant carrier and three other kids running through the door.  The easy thing is just toss them down and attend to the immediate needs like the puppy needing to go potty, the baby screaming from hunger, the diaper that needs to be changed, the 3 year old screaming he is hungry yet again and must have a snack RIGHT NOW, and other countless items.  Problem is once all those immediate needs are met I often do not go back to the pile/stack of items tossed on the said flat surface (repeat above paragraph for about a week and you have the actual picture of my kitchen).

SO.....I was in need of a new flat surface that wasn't needed for cooking, eating or other daily activities and could handle a few stacks until I could sit down to sort and organize them.  Luckily our dining area has a large enough recess to hold a table or other storage item.  My very short term fix was of course a table tray and looked something like this.


That worked for oh about a week and then the stacks outgrew the tray and once again spilled into other areas.  My ultimate desire is to find a nice looking console table (possibly with a drawer) that will fit the space and allow me the flat surface I desire but also a place to pull up a chair and do the things I find I am using the kitchen table for - Scholastic orders, school forms, quick mail and other items that I do not want to go downstairs to the office for.  So I set out on an adventure with my girlfriend and 6 kids (we are crazy like that) to find the perfect table.  Well all that we found were either too big for the space or for my budget.  Needing immediate gratification and a place to put things NOW I improvised with a cheap bookshelf and some baskets and media boxes (thanks to my friend for the idea).  Now I have FOUR flat surfaces to stack stuff on and hopefully some places to hide those annoying yet necessary items (pencils, crayons, sight word flashcards, not yet filed coupons, etc).


What do you think?  Looks much  better than the tv tray and will hopefully do the job until I can locate the perfect table.

Friday, October 21, 2011

Going TuTu Crazy

I have been wanting to make some tutus for the girls for a while now.  I finally found a great sale on tulle and had the extra money to stock up so I did.  As I do with everything I went a little overboard and became obsessed and started making as many as I could.  Instead of just making the one that I wanted for immediate use I went ahead and made them for all upcoming events J 


Princess Payton got a pretty pink and purple one for dress up:


Seems I have started a little tradition for Lilah Grace in that all of her “first” outfits will get a Mommy Made tutu to coordinate (thanks to my friend Stephanie for the wonderful idea). 

Lilah Grace gets a Halloween one which coordinates with her onsie:


Baby’s 1st Thanksgiving with coordinating tri-color tutu:


And of course her 1st Christmas with ribbon accents tutu:


Payton requested a tutu dress so I think I will need to get some more tulle to tackle that one but I am up for the challenge :)

And stay tuned to see the real reason I wanted to make tutus.  All of these were practice for me to perfect my skills for a special one.


Friday, August 26, 2011

Help Me Decide - Circles/Dots or Not??

I need some help making a decision (imagine that) regarding the letters in Baby L's nursery.  First a little history/back story.  I LOVE decorating the kids rooms!  We did not find out what we were having when preggo with P-Nut so of course the nursery was done gender neutral and in my favorite (had this theme planned LONG before ever meeting Jay) - Classic Pooh.  I loved the nursery and was so proud of it so of course when Buh-Buh came along it was obvious he would use the nursery and we moved P-Nut into a big girl room.  Still living in the townhouse and not wanting to put any of the kids in the basement bedroom when G-Man came along he got to share our room with us for the first year.  He never actually had a theme or a nursery (just a corner) and hence it was almost 6 years since I had been able to decorate a nursery.  So of course as soon as we moved into our new home I began to plan the new nursery (and was secretly planning it in every one of the 26 houses we looked at)!  Since I wanted a baby girl so badly and was totally convinced I was having a girl I planned accordingly.  I knew I wanted something girly but not over the top girly.  I loved the browns/tans/pinks coloring and began searching based on that.  What I was most drawn to were the retro circles and simple type of themes.  Well this was great because it meant that we didn't have to spend the $200+ for a nursery bedding set (which we could NOT have afforded) and that I could pick and choose different pieces to create exactly what I wanted.  This was also great because Jay actually agreed and liked the prints.  Something I also knew very early on was that I wanted to hang the baby's name above the crib in those oh-so-cute wood letters.  I was so excited for these letters that I actually purchased them all in February (I was not due until May) for BOTH names we had chosen.  I wanted to make sure that as soon as that baby popped out I was prepared to paint and hang her name (Hobby Lobby was very nice to take back the letters for the name not chosen).  The nursery was completely done and just awaiting the baby and the name (can you sense the build-up and anticipation?).

What I had envisioned was colored letters with either white or complementing colors circles/dots/spirals.  Well once Baby L arrived I painted the letters (in the first week of birth) and asked Jay what he thought about the circles and such.  Seeing as I could hardly wait to get them hung and patience is not one of my stronger virtues; the fact that my free-hand painting skills are weak at best; and that we had decided to paint the focal wall with stripes; Jay advised that I leave them solid.  Now I just have to add at this point that all my excitement and anticipation to have the nursery "complete" was not because we had tons of visitors and people to admire the nursery - NOPE it was for my own personal benefit.  The feeling of completion; the countless times I stood in the nursery staring at the wall admiring what we had done; and of course to take pictures and share them with family and friends who were not able to see it in person!

I was happy with what we had done until a friend (and also my favorite photographer) posted a photo of what she was doing for her daughters big girl room.  So now I am back to my personal dilemma of "circles/dots or not?".  At this point Jay is like "whatever - just do what you want" so he is no help ;)  So I am setting this to a vote.

Here is what the letters look like currently:

And here is the way I was thinking of doing them (either all white or using complementing colors on the different letters):
Now this picture was "borrowed" from Cindy Stansberry (credit where credit is due) and she did a great job - so great that I want to copy her.

It may help to see the entire wall and the bedding:

And here is the whole nursery:

Now most items in the nursery do have little dots on them but I feel that it is not overkill and that since this is the "theme" it is okay to use it throughout (but I am very open to other opinions).

Finally, for good measure here is a shot I like which includes precious Baby L in her crib:

Okay so now that you are armed with all the info - what do you think?  Circles/Dots or Not???

Tuesday, August 2, 2011

Crazy for Hair Accessories

When P-Nut was a baby I NEVER put anything in her hair or on her head.  This was mainly due to my mother telling me how silly it looked to have bald babies with hair bows taped to their head.  But also because I just was not into the frilly girly stuff back then.  Well after having two boys (who are PURE boy) I changed.  I suddenly found myself wearing pink (and loving it) and then became obsessed with purple.  I told Jay that if we were blessed enough to have another little girl I was going to do everything different.  I was going to put bows and flowers and headbands on her every day.  I was going to dress her up all the time and her wardrobe would look like a bottle of Pepto exploded on it.

I always looked at baby girl clothes and accessories and waited for the day that I could buy them for another one of my own.  So as soon as we found out we were expecting a baby girl I couldn't wait to start the collection.  On the way home from the ultra sound appointment I had Jay stop by a little boutique I had scoped out previously and I purchased the first hair stuff for Baby L.  Then it continued - it seemed every time I went to the store I picked up another hair bow or flower.  As you can imagine this adds up and gets expensive.

I spent hours on Etsy drooling over all the adorable headbands, bows and flowers and trying to locate the perfect one exactly how I imagined for an upcoming photo session with our amazing photographer.  I found a couple I liked but they were way more than I was willing to spend so I decided to Google (why didn't I think of this earlier) how to make hair flowers and headbands.  Wow was I surprised to discover how incredibly easy they are to make!  And of course this unleashed the inner craft junkie in me (she has been hibernating for a while) and in typical "Taryn fashion" I go a bit overboard :)

The kids were troopers as we spent a very hot day running all over town searching for all the supplies and that perfect flower.  Here is the first batch of supplies which we picked up:

Who knew that I could take simple silk flowers (the best selection from the dollar store) and turn them into this:


The girls also got customized flowers for the 4th of July.

And I even made some bow holders so they can all stay safe and be displayed on the wall.


I ordered a large batch of elastic from ebay and used needle and thread for the first time in years to make headbands to attach the flowers to.  I even successfully died my own elastic :)


And here are the supplies for our fall hair accessories so stay tuned...


I've Been Busy...

So now that I am finally starting to feel like I am getting our lives in order I am trying to work on the house.  It continues to be a work in progress and probably will be for quite some time.  We were in the townhouse for 6 years and never did get it just the way we wanted and left with a remaining to-do list.  Sometimes it is the simplest things that bring me the greatest joy.  Like hanging picture frames (this was done months ago) and then actually replacing that attractive family that comes in the frames with photos of OUR family :)  And updating all the frames with recent photos of each child (one frame had not been updated for three years).

Another area that has needed some serious attention is organizing.  In a previous life I was one of the most organized people.  Co-workers would probably say that I can be organized to a fault ;)  I have slacked off on this some but have recently found the motivation to become more organized.  And where do we need that the most?  Well toys, papers, art projects, toys, and did I mention toys?!?!  I found inspiration and great ideas at http://iheartorganizing.blogspot.com/ in addition to some I have been planning for a while.

My first project was to unload the boxes and boxes of DVDs and CDs we had.

On the outside this is a plain looking cabinet (left for us by the previous homeowner).

But on the inside it houses all of our DVDs, CDs, kid movies, and games.

The kids movies remain in their cases (in alphabetical order) in these great storage boxes I picked up way back when at Costco.

And for ours we removed them from the cases and put them in this binder (alphabetical as well).

The CDs are sorted by genre and then alphabetical in the same type of binder.

The next project was toy storage!  I have had these bins for the kids for a while but found that they are always using the excuse "But Mommy, I don't know where it goes".  I LOVE labels and use them for just about everything so of course I used one of my three label makers to label each of the toy bins as soon as we got this storage unit from IKEA at the old house.

I recently realized that this was great for Jay and I to keep things organized but 2 of the 3 kids responsible for cleaning up after themselves cannot read so this old labeling system was replaced by this:


I was so pleased with how the playroom labels turned out I decided to label the kids toy bins in their bedrooms as well.


I am hoping this solves the "I don't know where it goes" problem :)  And while I was in there I went ahead and did the walls in the boys room.  This has been on the project list since we moved in but I never got around to it.

So now that the toys are under control (I hope) I moved onto the next area that causes the most stress - Paper!  As all you parents of school age kids know, the paper can pile up quickly as they bring home art projects, assignments, and all those other paper things from school each day.  Being a closet pack rat I hang onto all of these items.  My system was to display the most recent art and school work and then to file it in a plastic storage tub - one for each child per year.  With just two being in school, I already have four tubs overflowing with stuff.  Then I discovered a post on http://iheartorganizing.blogspot.com/ and I knew I had to do it!  I had all of the items needed for this little project except the file tubs which I found on sale at Office Depot for just $6.99 each.  They even had all of the kids colors (yes our children are color coded to keep items straight).

First I used my new label making ability to personalize each tub.

Then it was time to create a folder for each child for each year of school.

And then put them in hanging folders into the storage tubs just waiting to add all of those school memories.

All the kids have their bins ready and waiting...

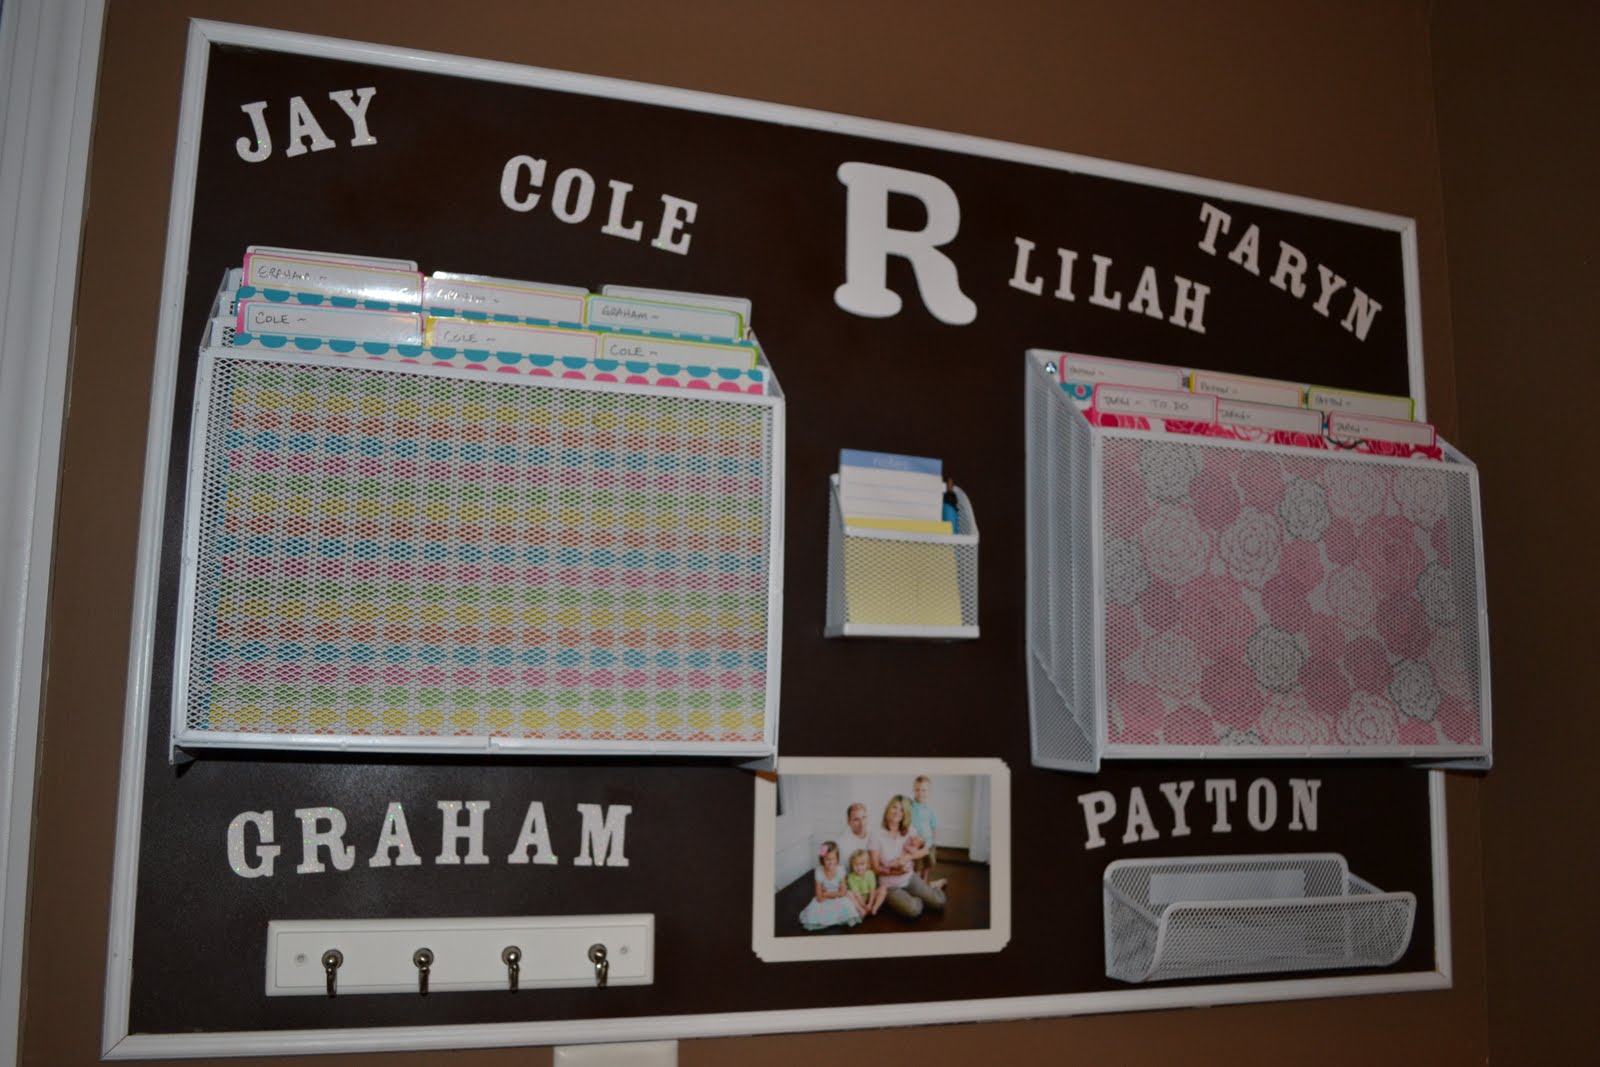
That solves part of our paper problem but it seems we still have so much piling up on the kitchen island, table and any other flat surface that I needed something else.  I also wanted to make sure that with two kids in school full time, playing sports, and my volunteer commitments, we were able to keep track of everything.  So the perfect solution was a family message/paper center.  I again turned to http://iheartorganizing.blogspot.com/ for some ideas and my mind starting working overtime.  I had a vision and I didn't stop until I made it come true.  I did have to go out and buy all the items needed and I splurged a bit because it had to be exactly what I had pictured in my head so the entire project cost around $50.


The finished product came out exactly as I wanted and I am so very pleased with it.  Cannot wait to keep our lives organized with this!  We each have a slot for our folders, a place for keys as you enter the house, a post it holder (because we use these all over the place) and a little catch all tray for Jay to drop his change and other small items.

Well that is what I have been doing the past week.  I have a growing list of other projects I want to accomplish so I will share as I complete them :)

.